The only difficult things in knitting are the techniques you haven’t tried yet.
When I was a beginner, I looked at all that beautiful knitted colourwork out there – fairisle, especially – and I thought, ‘Well obviously, I could never do that‘. And so I couldn’t, right up to the moment when I picked up my needles and tried. Because let’s face it, less competent people than us have produced truly beautiful work.
And once I’d mastered stranded work (of which fairisle is an example), I got greedy, and wanted to design my own pieces. Using colourwork in knitting enables you to paint pictures with yarn – imagine the possibilities! Heaven! One of the results of my efforts was the header for this blog. 🙂 I became a stranded addict, and learned a thing or two along the way, a few principles that I want to share with you in this post. But most of all, I learned that it’s not difficult. I’m nowt special in the knitting world: I’ve frogged projects a-plenty, and I have a shameful criminal record with the Knitting Police (though I still maintain that it was a stitch-up). So if I can design and make lovely designs, then so can you. Here’s what you need to know:-
For this post, I’m assuming that you’ve mastered stranded/fairisle knitting, so I won’t be covering how to do that. If you haven’t, take some spare yarn and go and experiment. Trust me, you won’t be disappointed. I’m also assuming that you can read knitting charts. This post is purely about how to design new work. You with me? You’re sure? Right, let’s do this. 🙂
So, to work. Traditional fairisle (and to be honest, any half-sensible stranded design) involves only two colours of yarn per row. You can change colours in different rows, you can use variegated yarn, but just don’t risk insanity or over-thick fabric by exceeding two strands per row. And remember you’ll be carrying the inactive yarn across the back of the work as a ‘float’. Overlong floats are not clever, especially in work that’ll take a lot of abuse, such as a garment of clothing. To avoid this problem, you can either ensure regular switching between colours (perhaps using just occasional dots of colour B if you’ve got a large area of colour A, as I did in portions of my blog header), or you can catch the inactive yarn behind the main yarn at regular intervals. Consider yourself warned. I wouldn’t leave a float of more than three stitches for clothing such as my skirt, or five stitches for something that’ll take less abuse, such as this cushion. But that’s just me: you wields da needles, you makes da rules.
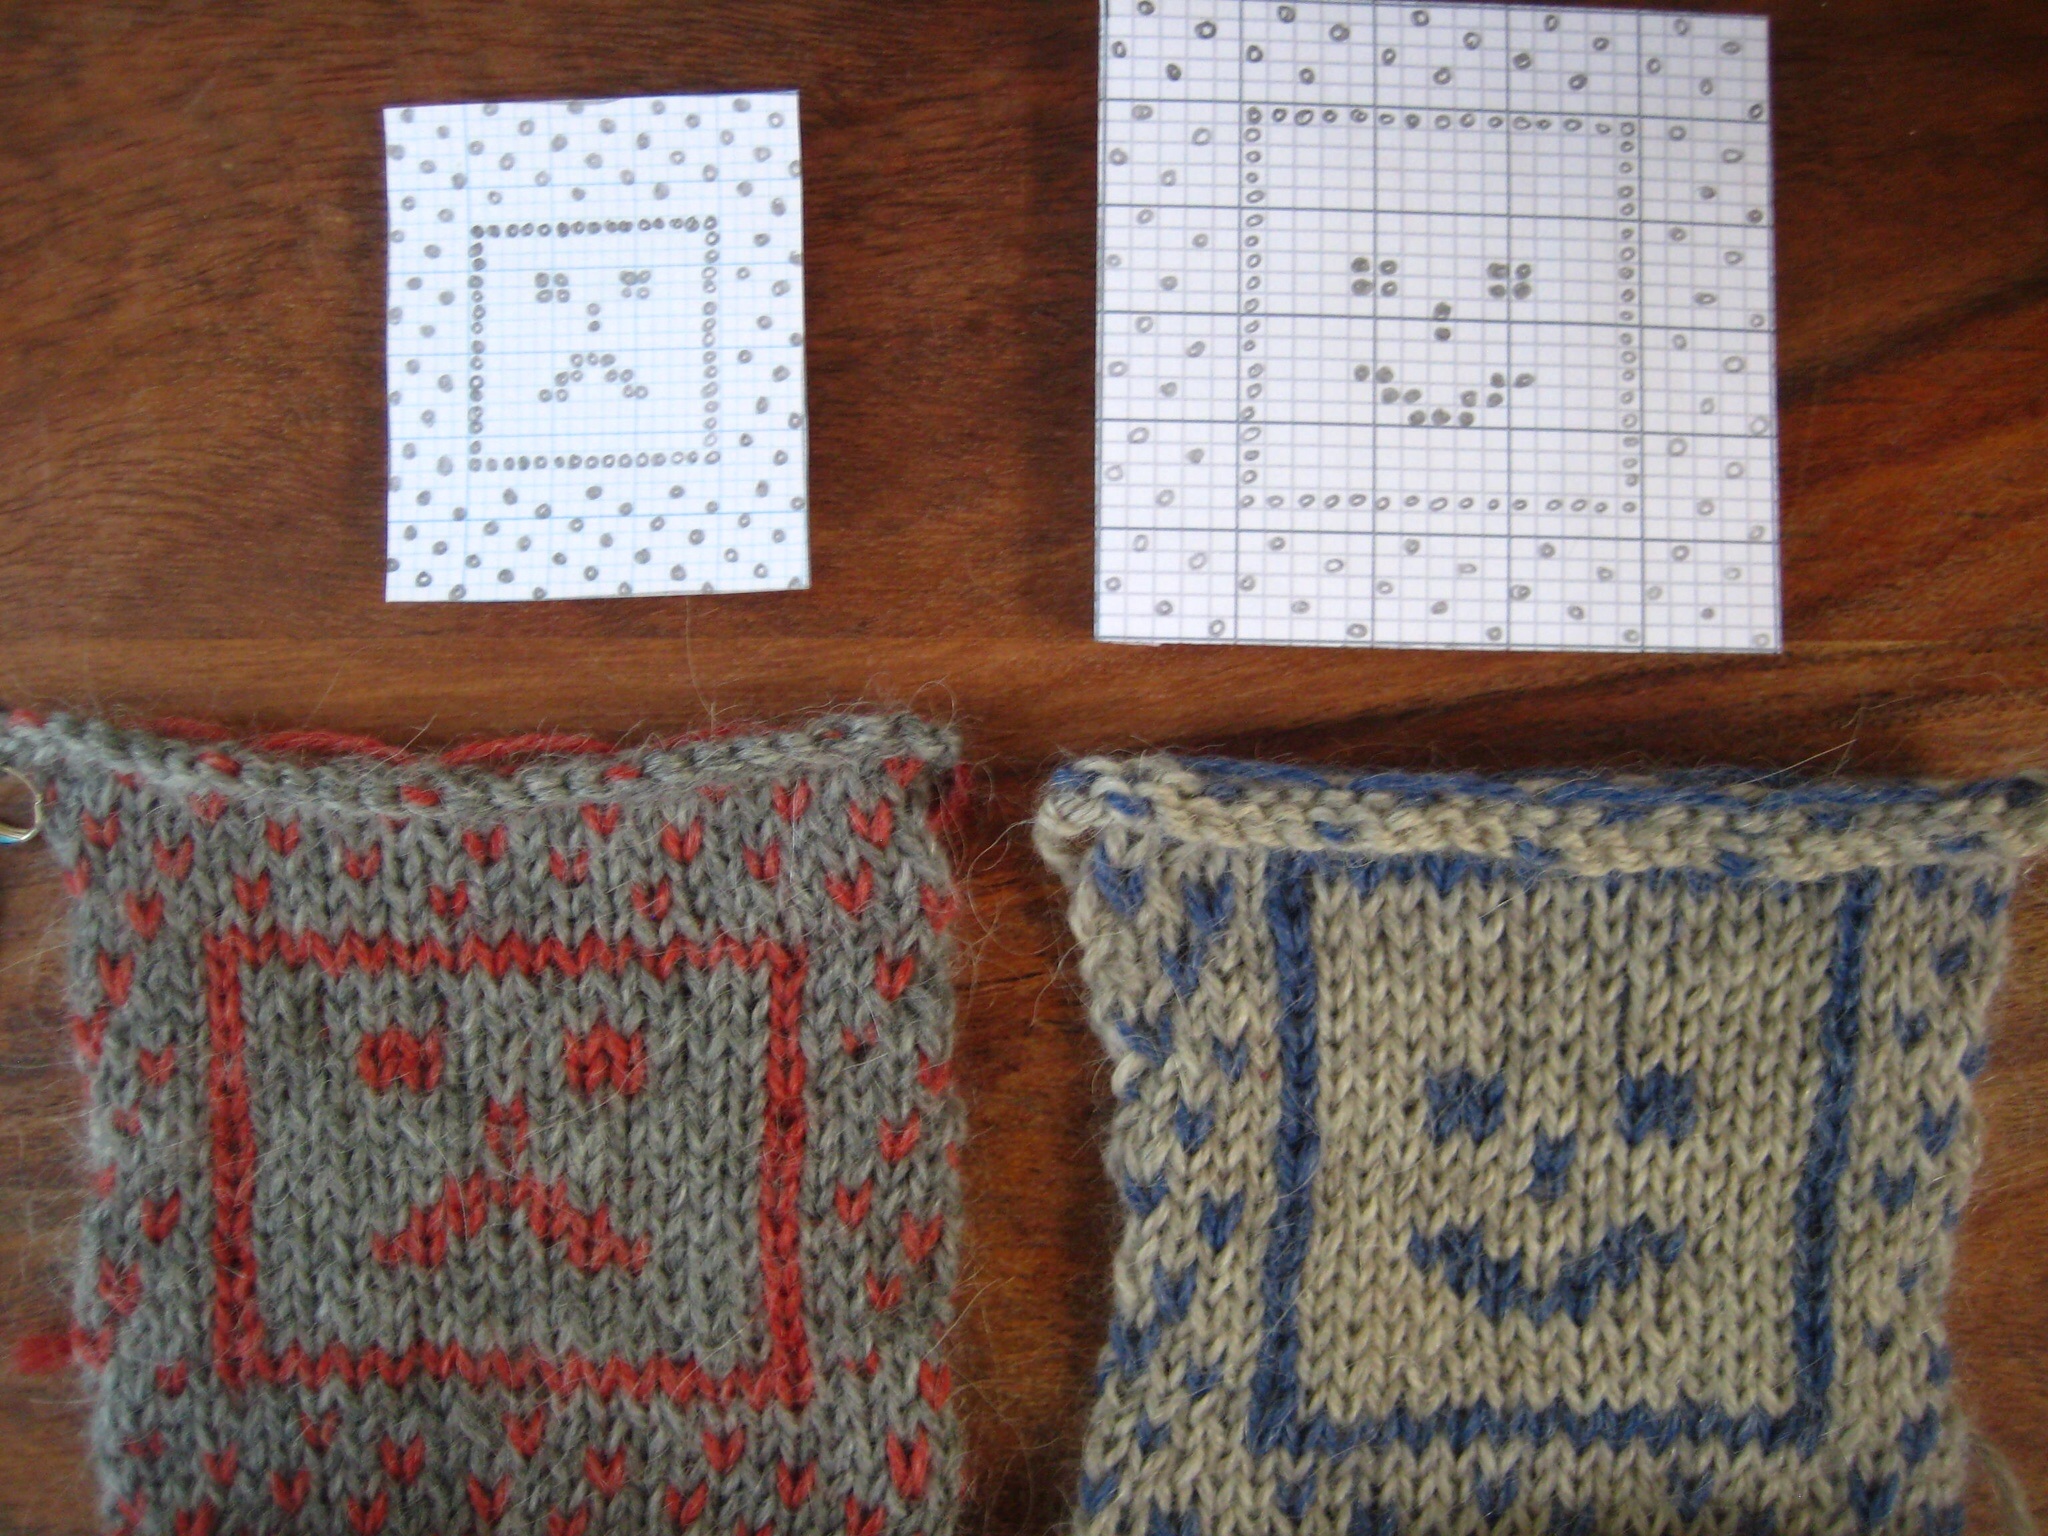
The final thing to remember when designing is that knit stitches aren’t square. Do not, (she says with an ultra-stern face,) design your motif using standard square graph paper. Knit stitches are wider than they are high, so you’ll end up with a weird elongated design that’ll make you frown. For this reason, knitter’s graph paper is readily available online for free. (There are design programmes, too, but for my lack-of-money, nothing beats pencil-and-eraser for the design process.) Here’s an illustration. In the picture below, the inner square has been drawn on both normal (square) graph paper and knitter’s paper. I’ve knitted up both designs, and look! The knitted square on the left (normal square graph paper) is, well, not remotely square. It’s much wider than it is high. The Knitting Police would be unamused. But in the piece on the right (knitter’s graph paper), the square I’ve drawn becomes the square I’ve knitted. Success.
You see? Yes?
OK, onwards.
The above is a very simple design, but I want to encourage you to knit anything. Imagine the freedom! I recommend first sketching out the outline of the picture/design you want to create using knitter’s graph paper, then filling in the dots in appropriate colours. In the design below, you’ll see I do literally use dots in each square, because if I just coloured in the whole area for a particular yarn, it would be hard to count how many stitches to knit in each colour. Trust me, I learned this the hard way. (Heavy sigh.)
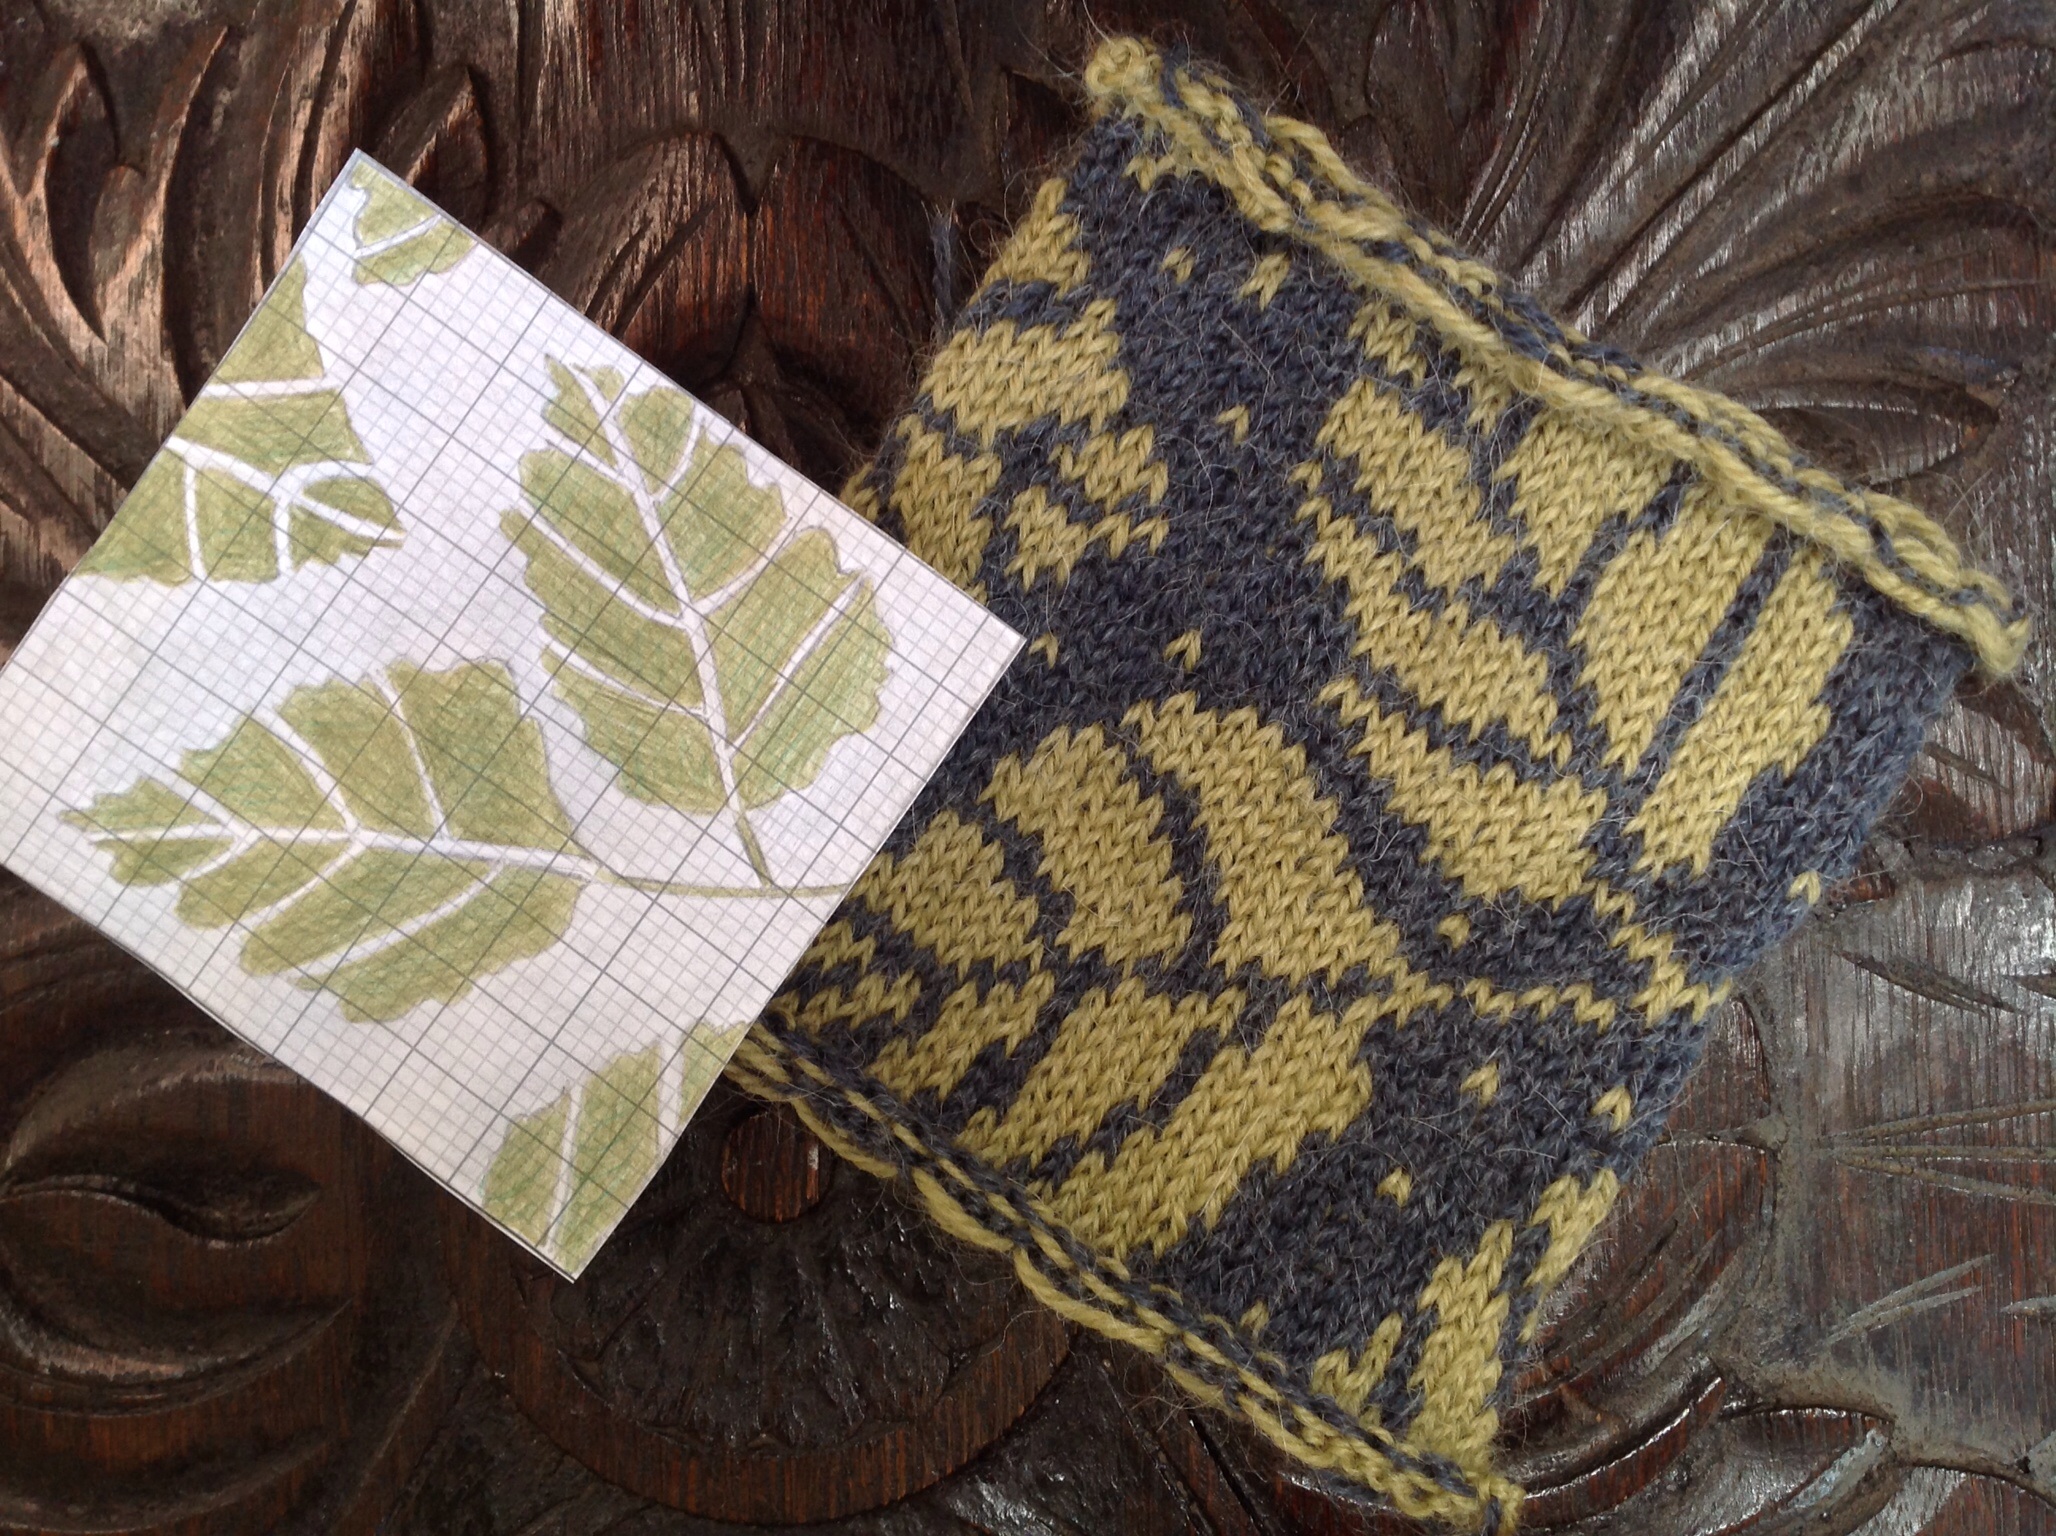
So, for this post, I decided to create a leafy design. I first sketched it out on knitter’s graph paper. I then translated it into dots. Looking at the design, I spotted some over-long floats so I added a few dots of green to break up long lines of the background colour. So, here’s the dotted design, ready to knit:-

Honestly, it was so much fun creating even this simple design. The freedom! The possibilities!
Then, the knitting. And I’ve included an image of the original sketch that became the dotted motif. OK, so I coloured it in: so sue me. Usually I’d just sketch an outline, then fill in the dots.
When designing, try to avoid long vertical lines, as you can sometimes end up with an unsightly gap between your two colours. Diagonals are always better. That said, I seem to have got away with it in the above examples: rules are there to be broken.
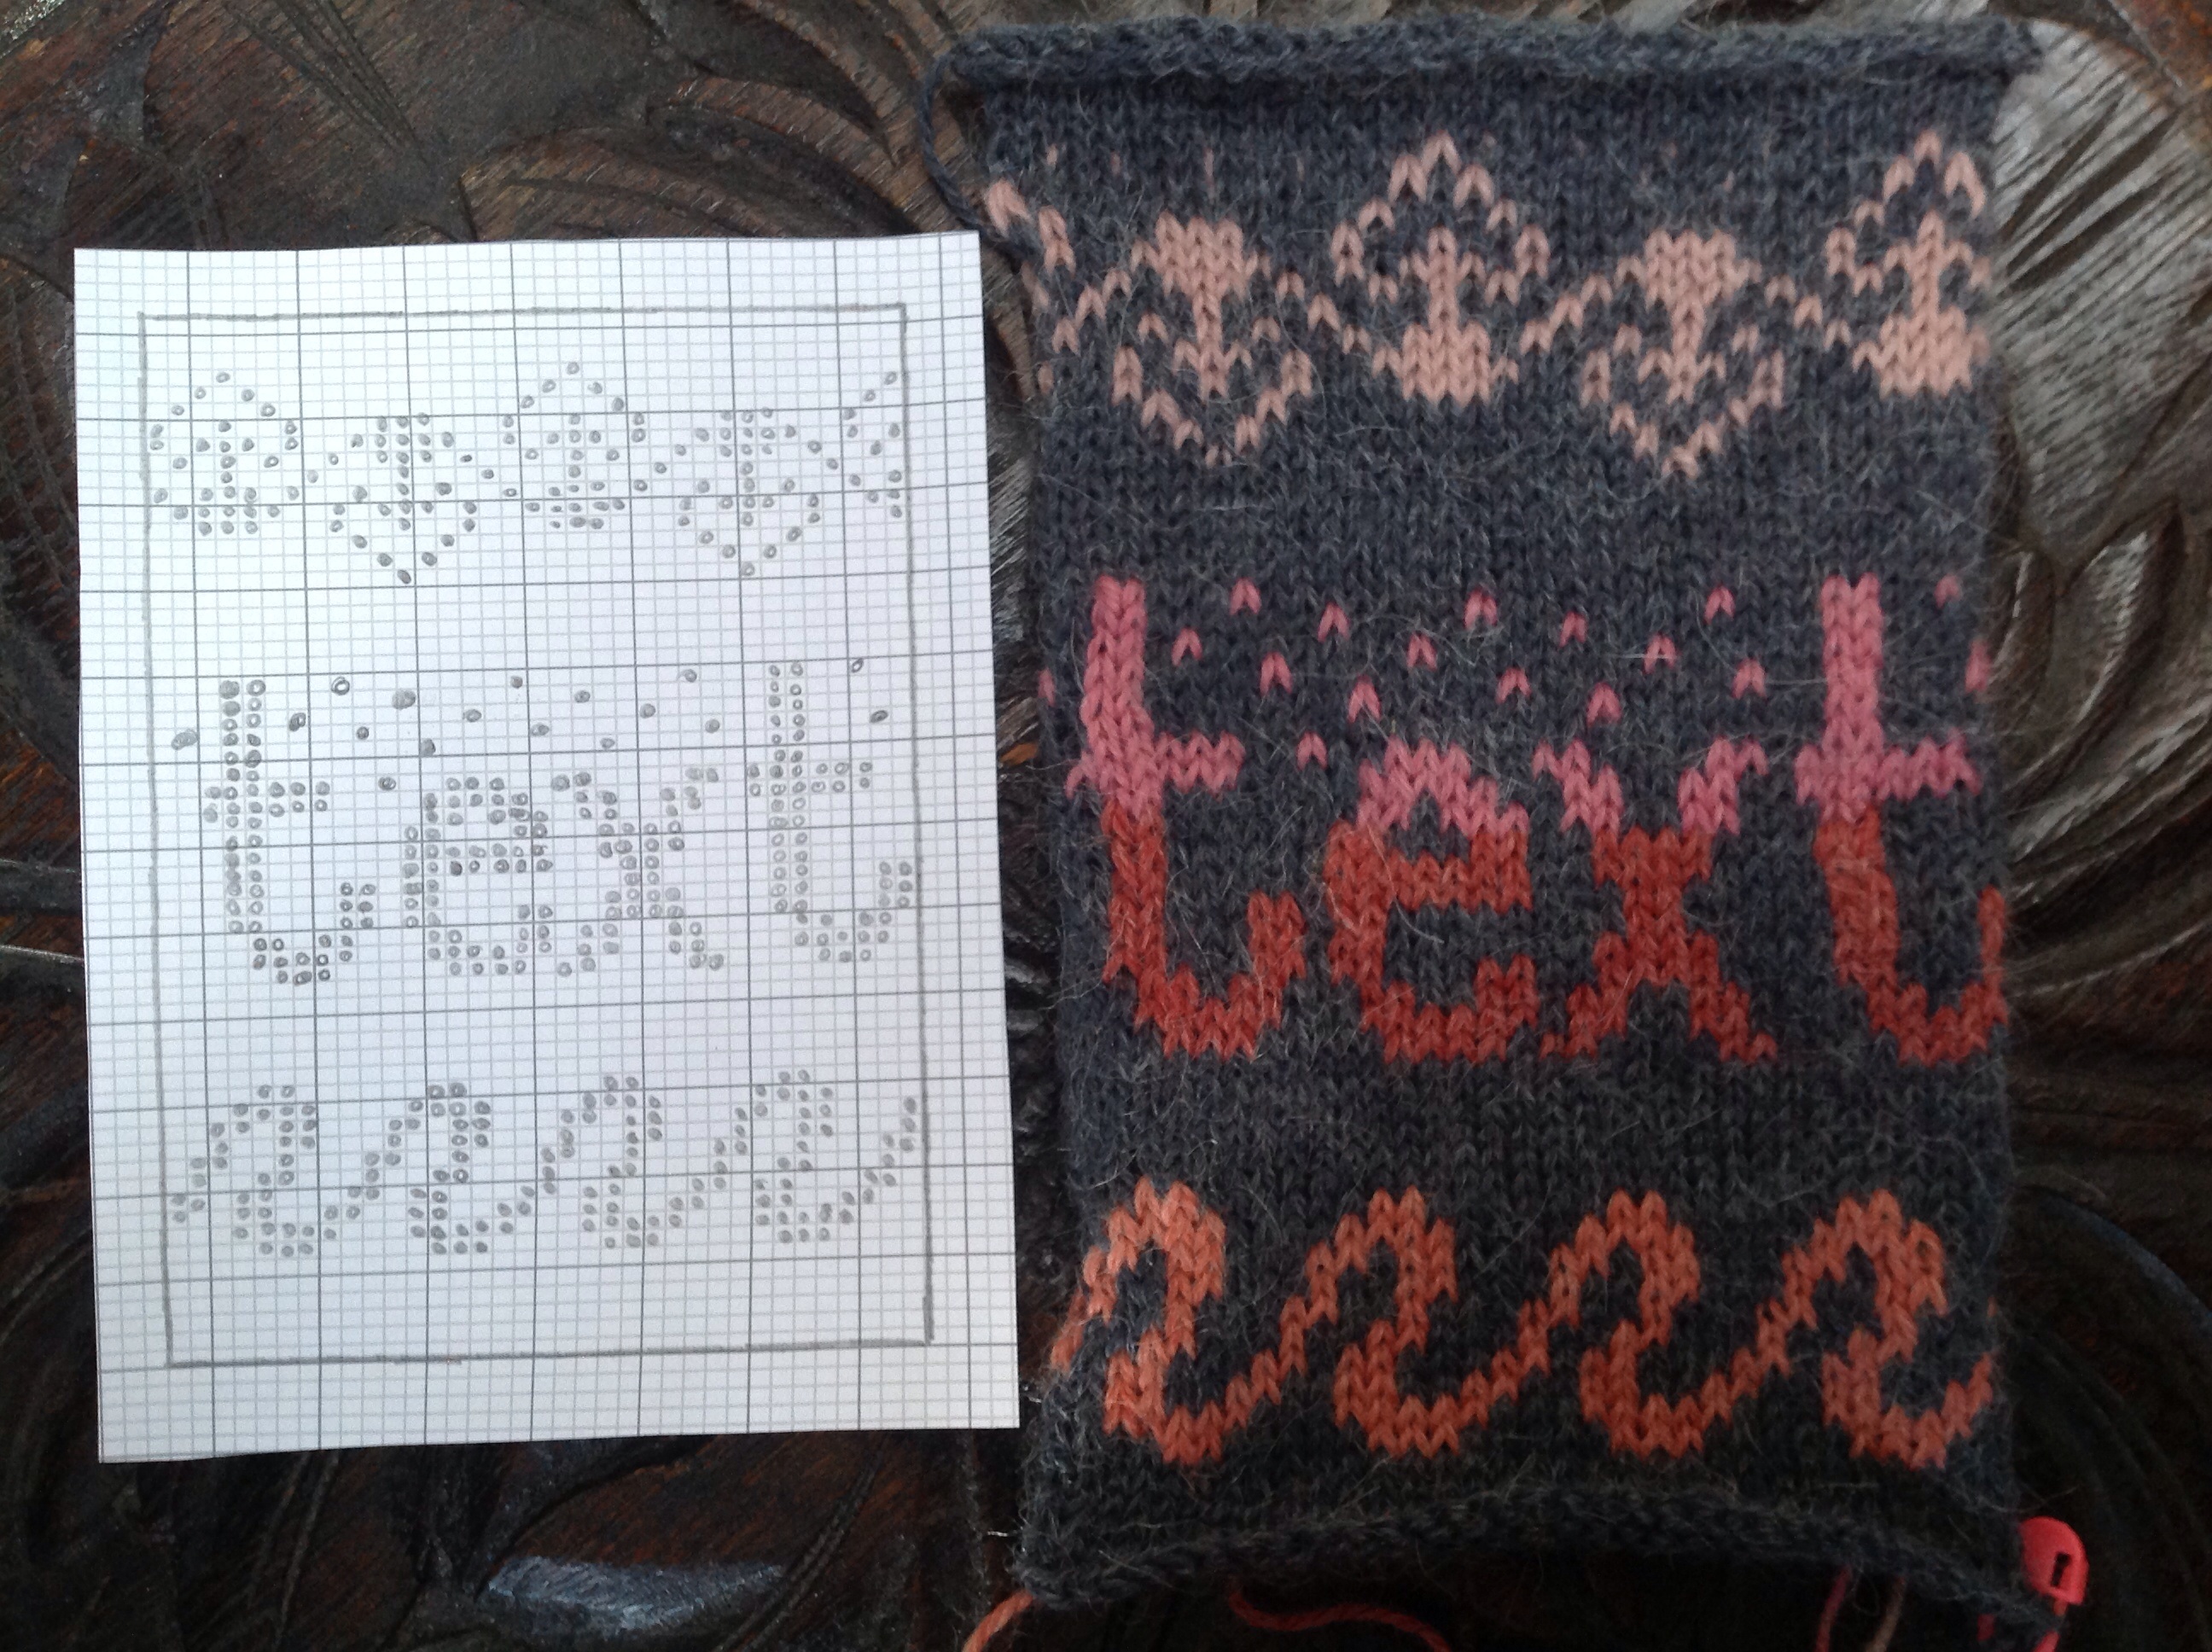
And of course, you can add text. Here’s another example of a design I sketched then knitted. I’ve doodled my own designs above and below the writing, but if you’re interested, there are books and websites available full of traditional fairisle/stranded motifs. Repetitive designs are generally a good way of ensuring you avoid over-long floats. Obviously, using text risks breaking the no-verticals rule, but I got round this when designing my blog header by using italic text.
And that pretty much covers the basics. As I’d advise for any technique, practise using spare yarn, and have fun. You won’t regret it.
Coming soon: how to steek (fearlessly and sober).
www.deramores.com/blog-awards: This blog entry is my submission to the Deramores Blog Awards 2014. Deramores is the UK’s number one online retailer of knitting and crochet supplies.
I love this post. Very interesting. I’ve designed intarsia-based colourwork but never much stranded stuff; I’ll have to give it a go.
Thank you. 🙂 I’ve always found stranded much easier than intarsia – I guess it’s a personal thing. But intarsia gives you even more flexibility in design terms, I assume?
Great post and very informative. It takes some of the fear away. 😉 thanks for sharing!
Thank you! Save the fear for any sabre-tooth tigers you happen to meet. This stuff is easy. 🙂
I don’t know about saber tooth tigers but we have had mountain lions walking threw my Parent’s back 40. They used to throw used kitty litter in a low spot in their driveway and they have found big kitty foot prints in the mud around it. I’d love to get pictures of that & preferably ones taken through a glass window. I’d take a knitting challenge any day over a face to face on counter with any wild cat.
A brilliant post. Really informative and I love your sense of humour too x
Thank you. 🙂 I do struggle to be serious for long. Your gift decoration post on your blog is fantastic and inspiring, by the way…
Very nicely explained and illustrated 🙂
Thank you!
How cool! I don’t know anything about anything in knitting but I love the effect you get with this! And you do a great job of explaining and using your knitted examples to illustrate!
Awwww, thank you, as always. 🙂
Great post – inspiring! Looking forward to your post on steeking – I am building up the courage to give it a go!
Thank you. Steeking tutorial coming soon. It’s only scary until you try it.
Oh! It seems very easy! Thanks for your easy tutorial… Love it!
Regards,
Sindhu
Tantu
The Arts & Me
Thank you! It really is that easy. Meanwhile, I love the inspiration on your blog. 🙂
Hey, also, Best Wishes for the Contest 🙂 May you win!
Thank you. The competition is tough….
Like the idea of knitters graph paper, might have ago at a my own design over the school hols, I’ve got a little caught up in double sided knitting, so the process should work for that too.
Definitely give it a go! I’m so impressed by your double-sided knitting. (Love the Dr Who police box.) How is that even possible?!
You have 2 contrasting colours , so to start out all the blue stitches are knit & the white are purl, so it’s like ribbing. Then it gets a little more interesting. At least you do not have trialling bits on the back & less end sewing ( yippee). I’ve nearly finished Star Wars. You should give it a go.
Brilliant tutorial! I really have no desire to do intarsia, but I can totally get on board with Fair Isle and stranded color work. I’ve really only made one Fair Isle project, but I enjoyed it very much….don’t know why I haven’t tried it more. Thanks for the inspiration. 🙂
Fairisle/stranded is totally addictive…. I hope you do more. (And I’m with you on the intarsia-avoidance.)
Oh yeah, I learnt the don’t-use-solid-squares for patterns too! Although I hadn’t actually learnt it until you pointed it out- I was just getting annoyed at it!
🙂 It does make a big difference to the appearance of the finished work, definitely.
I’ve always known there was a difference between regular and knitters graph paper, but I didn’t quite grasp what a difference it makes. Thanks!
Awwwww, thank you. 🙂
These look amazing, but I’m way intimidated to try this myself. Maybe this post will kick me into it.
Thank you. 🙂 It really isn’t difficult, I promise. Go for it!
Love the leaf design and colours – do you have plans for it? Cushions??
Thank you. Yes I think cushions would be the best use (once I’ve completed a million other projects!)
I’ve always been too scared of colour work, but you make it look so easy and those wonderful results! I’m just gonna have to give it a go now 🙂
It really really really isn’t difficult. I was scared of it, too. Get some scrap yarn and play. I guarantee addiction will follow very shortly…
You’ve got me, I’m gonna have to give it a try : D although I’m pretty sure it will take me an age to reach your incredible standard! Something to aim for 😉
Totally <3 your header! 🙂 ❤ <3
Very nice! I didn’t know that knit stitches are wider than they are longer, good advice! I must admit that I have not really done any successful stranded knitting, but seeing your lovely designs makes me want to try again!
Hello there, I’ve just popped over to congratulate you on winning the Deramores best undiscovered knitting blog, I won the crochet version and am so chuffed at being in such great company! The tips you’ve shared here are brilliant and as I’m just starting to get into fair isle knitting (I’m just at the very early stages) I’m sure I will be able to use your advice in future – I hope I can at least, yes I worry I won’t be able to ‘do it’. Well done, Sam xxxx
Yeah! Huge congratulations, so VERY well deserved x
ahh where did you get knitters graph paper? I used squared paper for my most recent foray into Sanquhar knitting and kept on having to tape more bits together…
Hi! The paper I use is at theknittingsite.com, but if you Google ‘knitter’s graph paper’, you’ll find lots of options, including different options of length vs width proportions. Enjoy!
ooh thanks! am going to play around with more Sanquhar patterns so will get some to help the playing!
ah.. I see you say there are free progs to print it … any preprinted versions? I will google
Love this post! I’ve designed several stranded motifs of my own, by adding regular decreasing still confounds me. Of course it’s easy if there are large chunks in the background colour (you just place the decreases there), but incorporating decreases without distorting the pattern… well that’s the next step!
Meant to say “but adding regular decreases still ….”
very inspiring. I might just pick up my old knitting needles again. Thanks a mill! 🙂
I must master Intarsia!!!
Can’t wait to give this a try!
Still afraid from heem…if anything, even MORE afraid from heem! 🙁
🙂
Intarsia? Steeks? Have I landed in Oz?! (Going to hide under the bed now with my paper bag for hyperventilation purposes…)
Well just for the record, intarsia makes me hyperventilate too, but steeking is cool. Are you OK with that paper bag? *peers under bed* You can come out now – I promise not to do anything too scary with knitting needles…
I don’t think I can have “steek” as a vegan…still under the bed but not hyperventilating too much…
*giggles at vegan steek* You sure you font want to come out from under that bed? It looks kinda squashed down there. I have biscuits….
Just shove the bickies under the bed. I will work out how to snarf them through the paper bag (chocolate chip osmosis?!)…
Nah. No coming out, no biscuits.
🙁 (No biscuits, no increased derriere sizeage…always look for the silver lining! 😉 )
Good reframing. 🙂 By the way, the weirdo called Phil who just sent you a FB friend request was me. Feel free to ignore. (I am quite weird.)
HAHAHA You had better ask me again as Stevie-boy figured it was one of Paulines crazy men friends and deleted it. I will friend you “Phil” so long as you promise to teach me how to knit…er…second thoughts, that is seriously going to take some chutzpah! I will just have to trawl your backlogs and sniff around for the easiest stuff (do you EVER do easy stuff?!) to start on so that when I have to (inevitably) frog it, I won’t be yelling to loudly and upset the neighbours (1km away…)
Back here for a second look at this post. Still fibs! 😉
What a fun and helpful post! Thank you!
Aww, thank you! Seriously.