Steeking (aka setting your knitting up to be cut, in order to turn a knitted-in-the-round piece into a flat piece, for example to open up the front of a cardigan) tends to scare otherwise bold and courageous people. It feels vaguely wrong to take a pair of scissors to your knitting.
Really, it shouldn’t. Honestly. It used to scare me, until I tried it a few times, at which point I thought, “Is that all?” The secret is this: *whispers* Knitting doesn’t especially mind being cut vertically. (Cut horizontally, and you’d be in a for a whole hairy heap of horror, though.) There’s a wealth of advice out there in the blogosphere, some of it wonderfully detailed and advanced and immaculately illustrated. I’m not even going to try and replicate that, but I will try to condense it. Dis is da basics, no? Steeking 101. Steeking for people who are too busy/impatient to be world experts. Steeking for dummies… like me.
Why Steek?
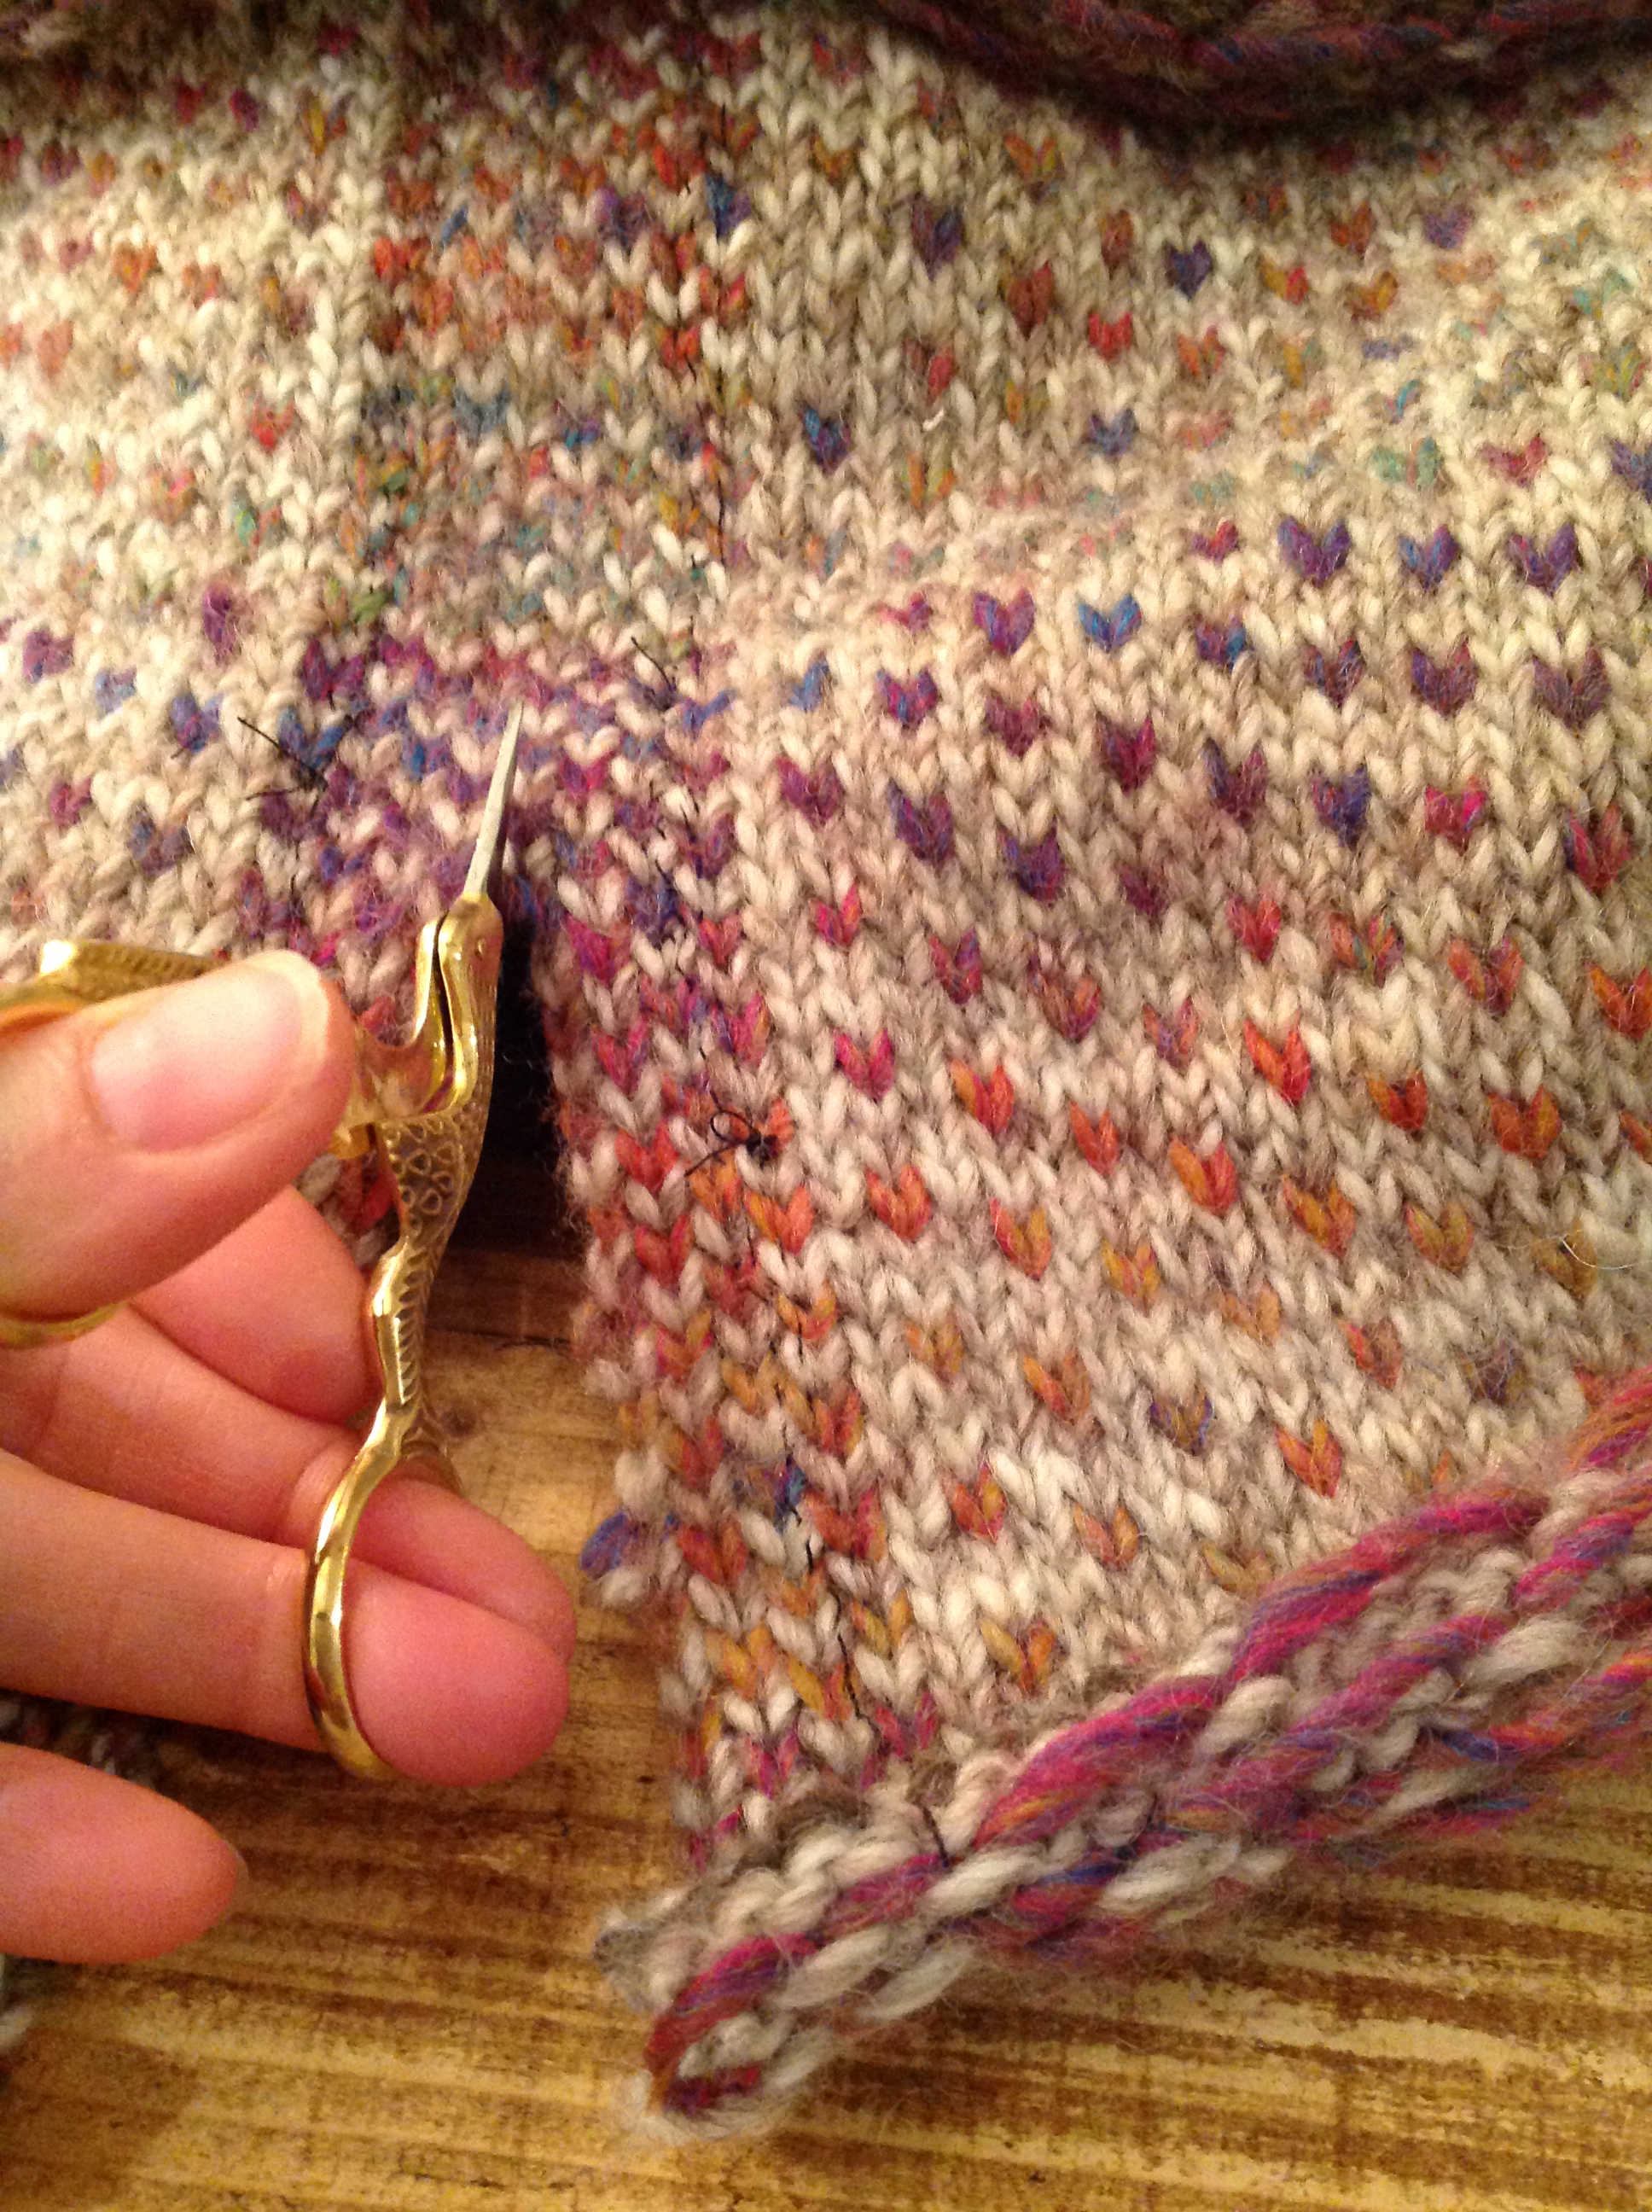
Fair question: I see that you are a knitter of uncommon perspicacity. A steek is a set of extra ‘bridging’ stitches added in addition to the pattern in a piece of in-the-round knitting, in order to reinforce and cut those stitches to produce a flat piece of knitting. Why would you do that? Well usually, it’s used in colourwork, ie fairisle/stranded knitting, as in the picture above. If you’ve ever tried purling stranded work, you’ll understand why sticking exclusively to knit stitch in the round is vastly preferable. Purling in stranded/fairisle work is poo. Don’t do it. Just don’t. It will visibly age you, which would be a dreadful shame because you look perfectly lovely just the way you are.
How To Steek
Ah, now you’re talking. There are a few basics that you need to know. Let’s award them each a neat, round, inky-black bullet point:-
- What yarn are you using? No, I’m not just being nosy.
Actually, I am.The more that a yarn will felt, the more suitable it is for steeking. So a nice Shetland pure wool will work perfectly and maybe not even need any reinforcing stitches. It’s no coincidence that it’s fairisle knitting that’s best associated with steeking. Animal fibres are (generally) good, though anything superwash is not. Artificial fibres ain’t great for this technique. The more slippery the yarn, the more unsuitable it is. I guess that nothing is absolutely ruled out, but you’re going to have to think long and hard about how much reinforcement your stitches will need if you’re using an ultra-smooth synthetic or cotton yarn. Sorry. You may wish to consider superglue… *joking*
- Extra stitches. Listen up, people. Stop fiddling with your phone, and pay attention, because this is important. The steek comprises some extra stitches that are added for the express purpose of sewing the outer ones in order to secure them, then cutting down the middle. You don’t need many stitches to achieve this: in fact, the fewer stitches there are between seam and cut, the less there is to unravel. But try telling that to a newbie such as me in the (old) example photographed above. I thought more stitches meant more security, so I added eight. In pure wool knitting. Not really necessary, (though more stitches may be helpful in slightly less feltable yarns). Anyway, let’s move on. Steeking is typically used in stranded/fairisle work, and in such cases, I recommend knitting a ‘chequerboard’ pattern for the steeking bridge, as you can see in the photo above. This makes it easy to ‘catch’ everything in your steeking stitches, and also makes it nice and obvious where the bridging stitches are. You can steek with just one yarn, though, as I’ve done for my knitted picture of a mandala.
- Sewing. So, you need to reinforce what will be your two edges before you cut down the middle. There are various ways of doing this. I’ll briefly mention two, before telling you in detail about how I do it:-
- Crochet-chaining your edges. Google it, if you’re tempted. This method very neatly holds in the cut edges.
- Machine-sewing beside where you’ll cut. Quick and easy, but watch that you don’t accidentally catch your floats in the machine mechanism. And you risk not catching every thread, because you don’t have exact control over where every stitch lands.
(But I’d quite like to use this method, because I’ve got my great great grandmother’s 1895 Singer sitting, rarely-used, in the cupboard upstairs.) - My own personal favourite, hand-sewing the edges, because you can see exactly where every stitch lands. Here’s how. Let’s assume we’ve got a lovely fetching brown-and-blue piece of stranded work in progress. No need to adjust your sets, people, but you may wish to fetch your sunglasses in from the car. See the picture below. I’ve chequerboarded the bridge stitches that are to form the steek. In the picture, the cut will (later) be made along the dark red central line. There are two columns of stitches on each side of the cut. This is especially important in colourwork, where you want to catch both colours. (Am I making sense yet?) The black lines in this picture are where I’d sew, catching the two colours by sewing a half of adjacent stitches. (Don’t you love that knit stitches are like little hearts? I once sewed the occasional red stitch into a stranded skirt, and people said, ‘Oh that’s lovely that you’ve knitted hearts into your design’. But I digress – not for the first time, and not even remotely the last.)
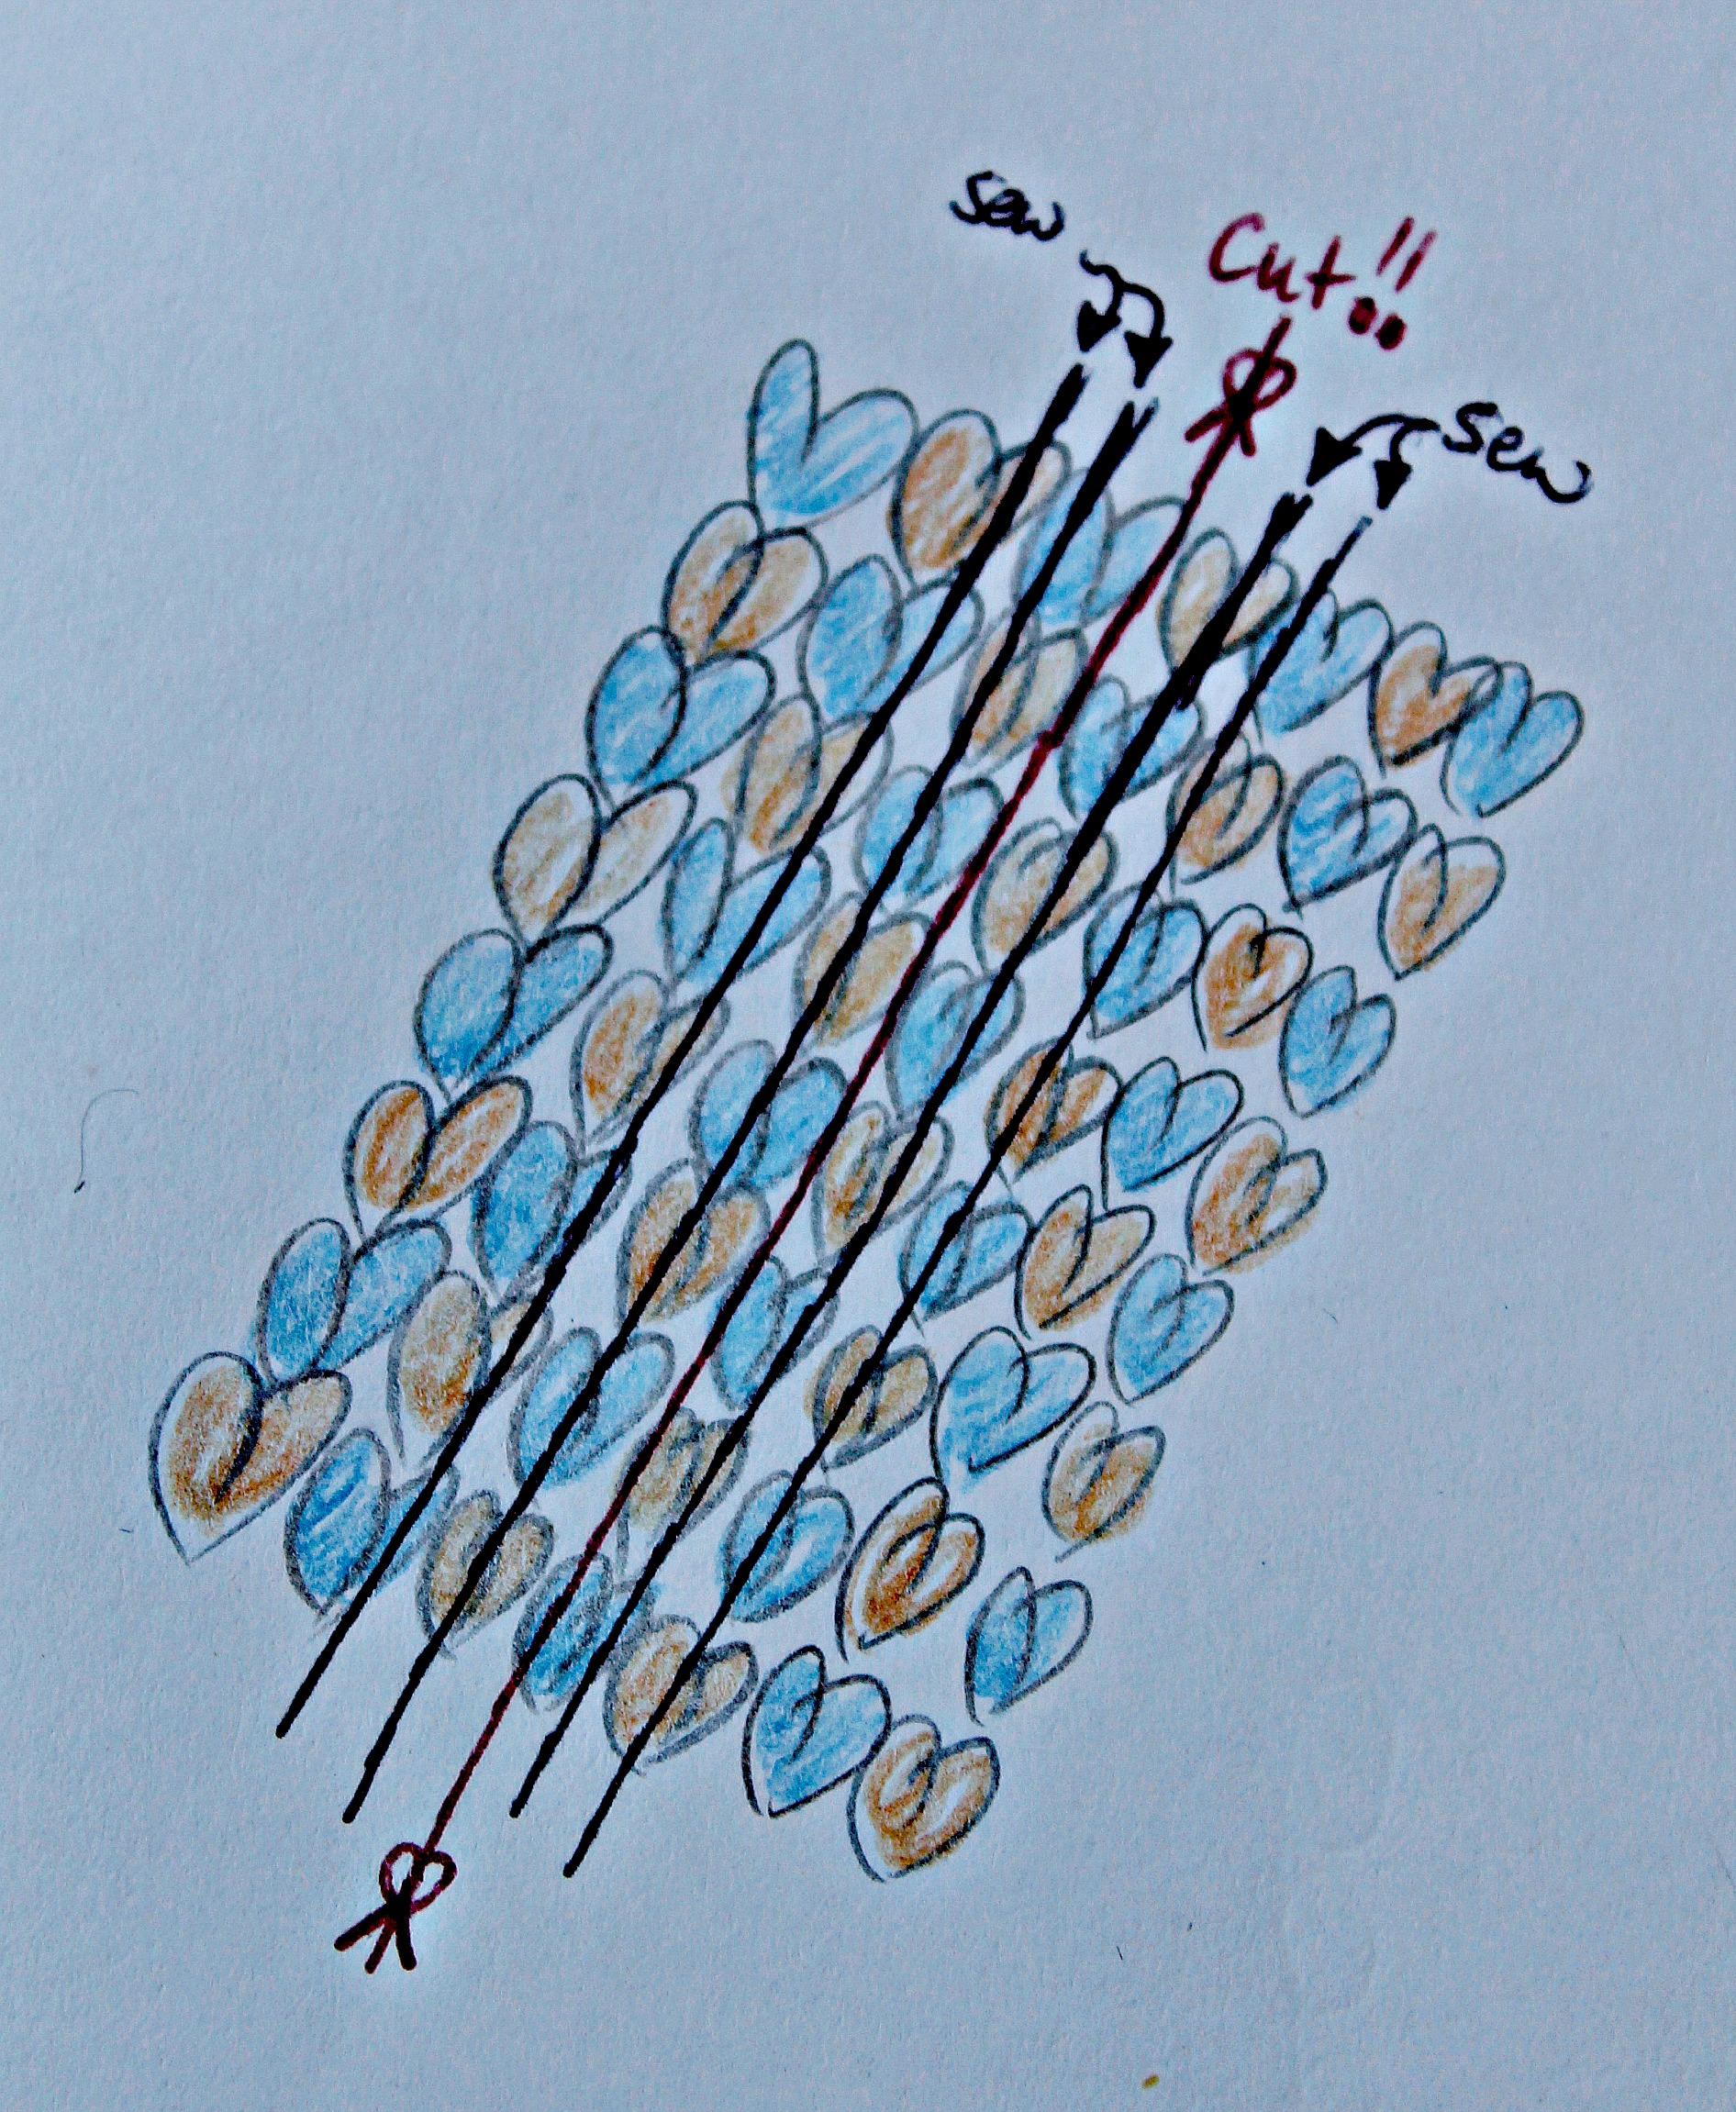
For sewing, use a yarn of the same constitution as the knitting (100% wool, for example), though it can be thinner than the yarn with which you knitted. Now, there’s a special way of sewing this. It’s called backstitch. I’ve tried to illustrate it below. In this example, you’d insert the needle in row 2, then bring it out again in row 1, insert it in row 3, bring it out again in row 2, insert in row 4, bring it out in row 3, etc. Make sure you’re using a nice sharp needle, because you want to pierce through the middle of each thread. So stitches on every row will be pierced. Twice. Ha! That’ll learn ’em.

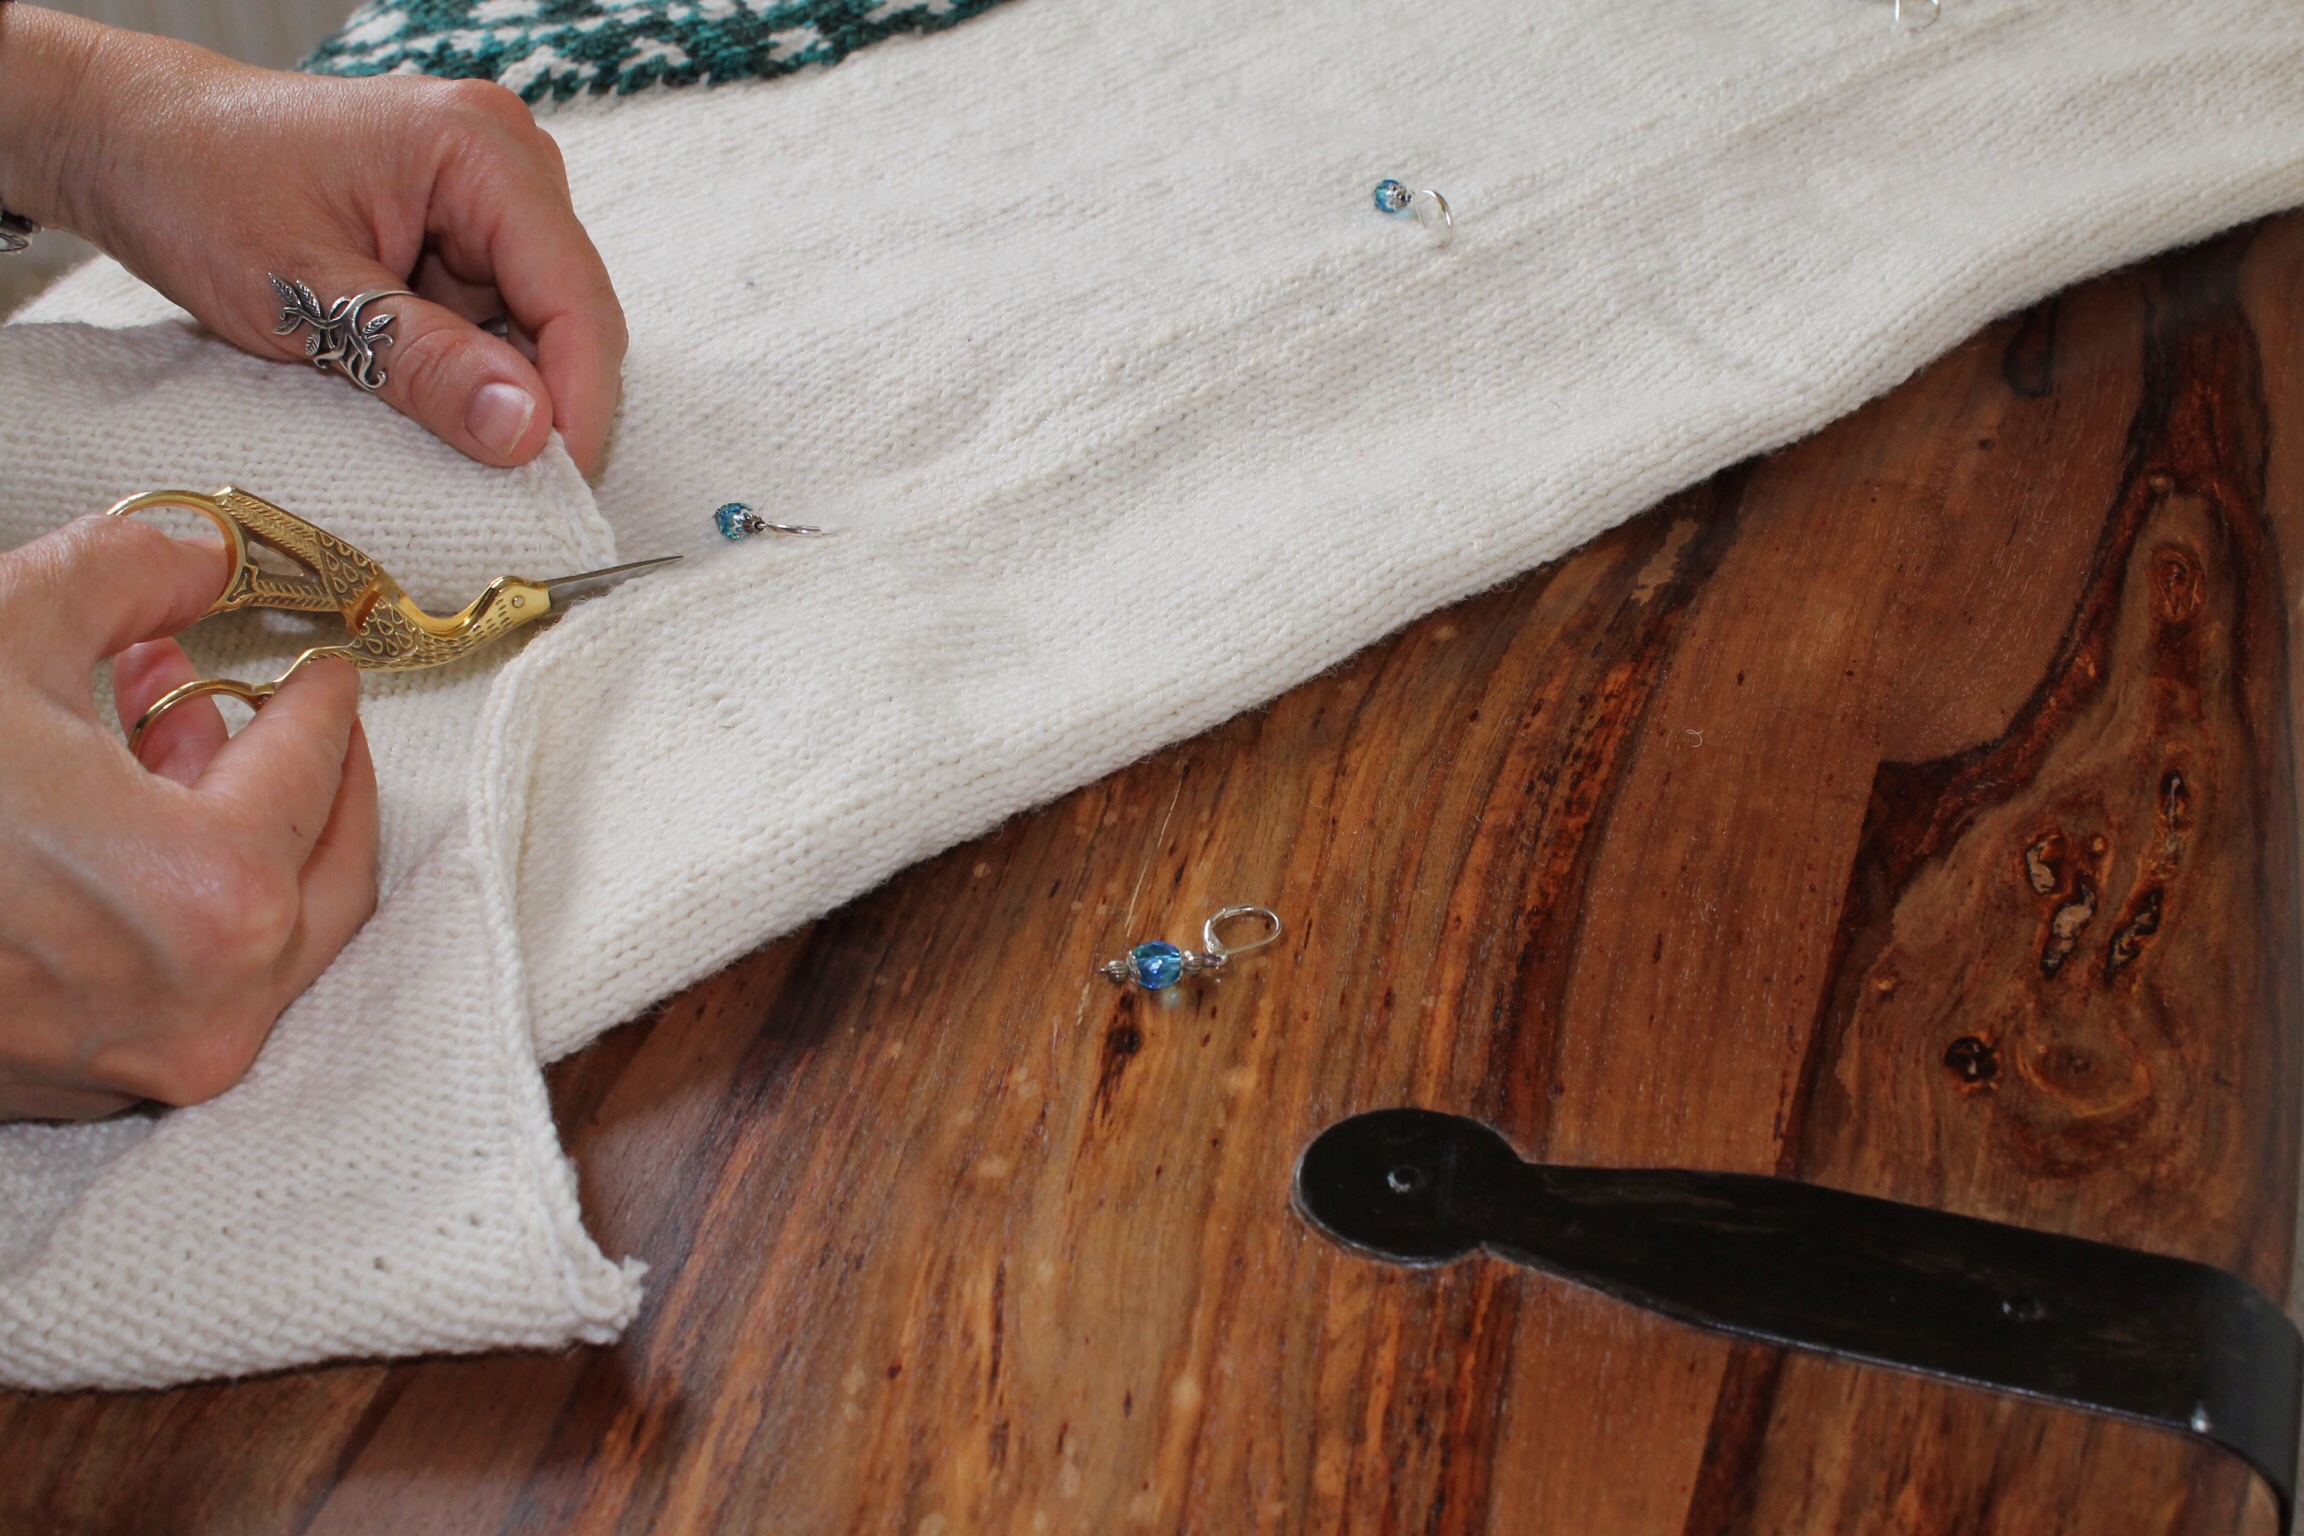
Here’s the process of sewing the steek on my knitted mandala picture. The stitch markers are just to remind me of where I’m working:-

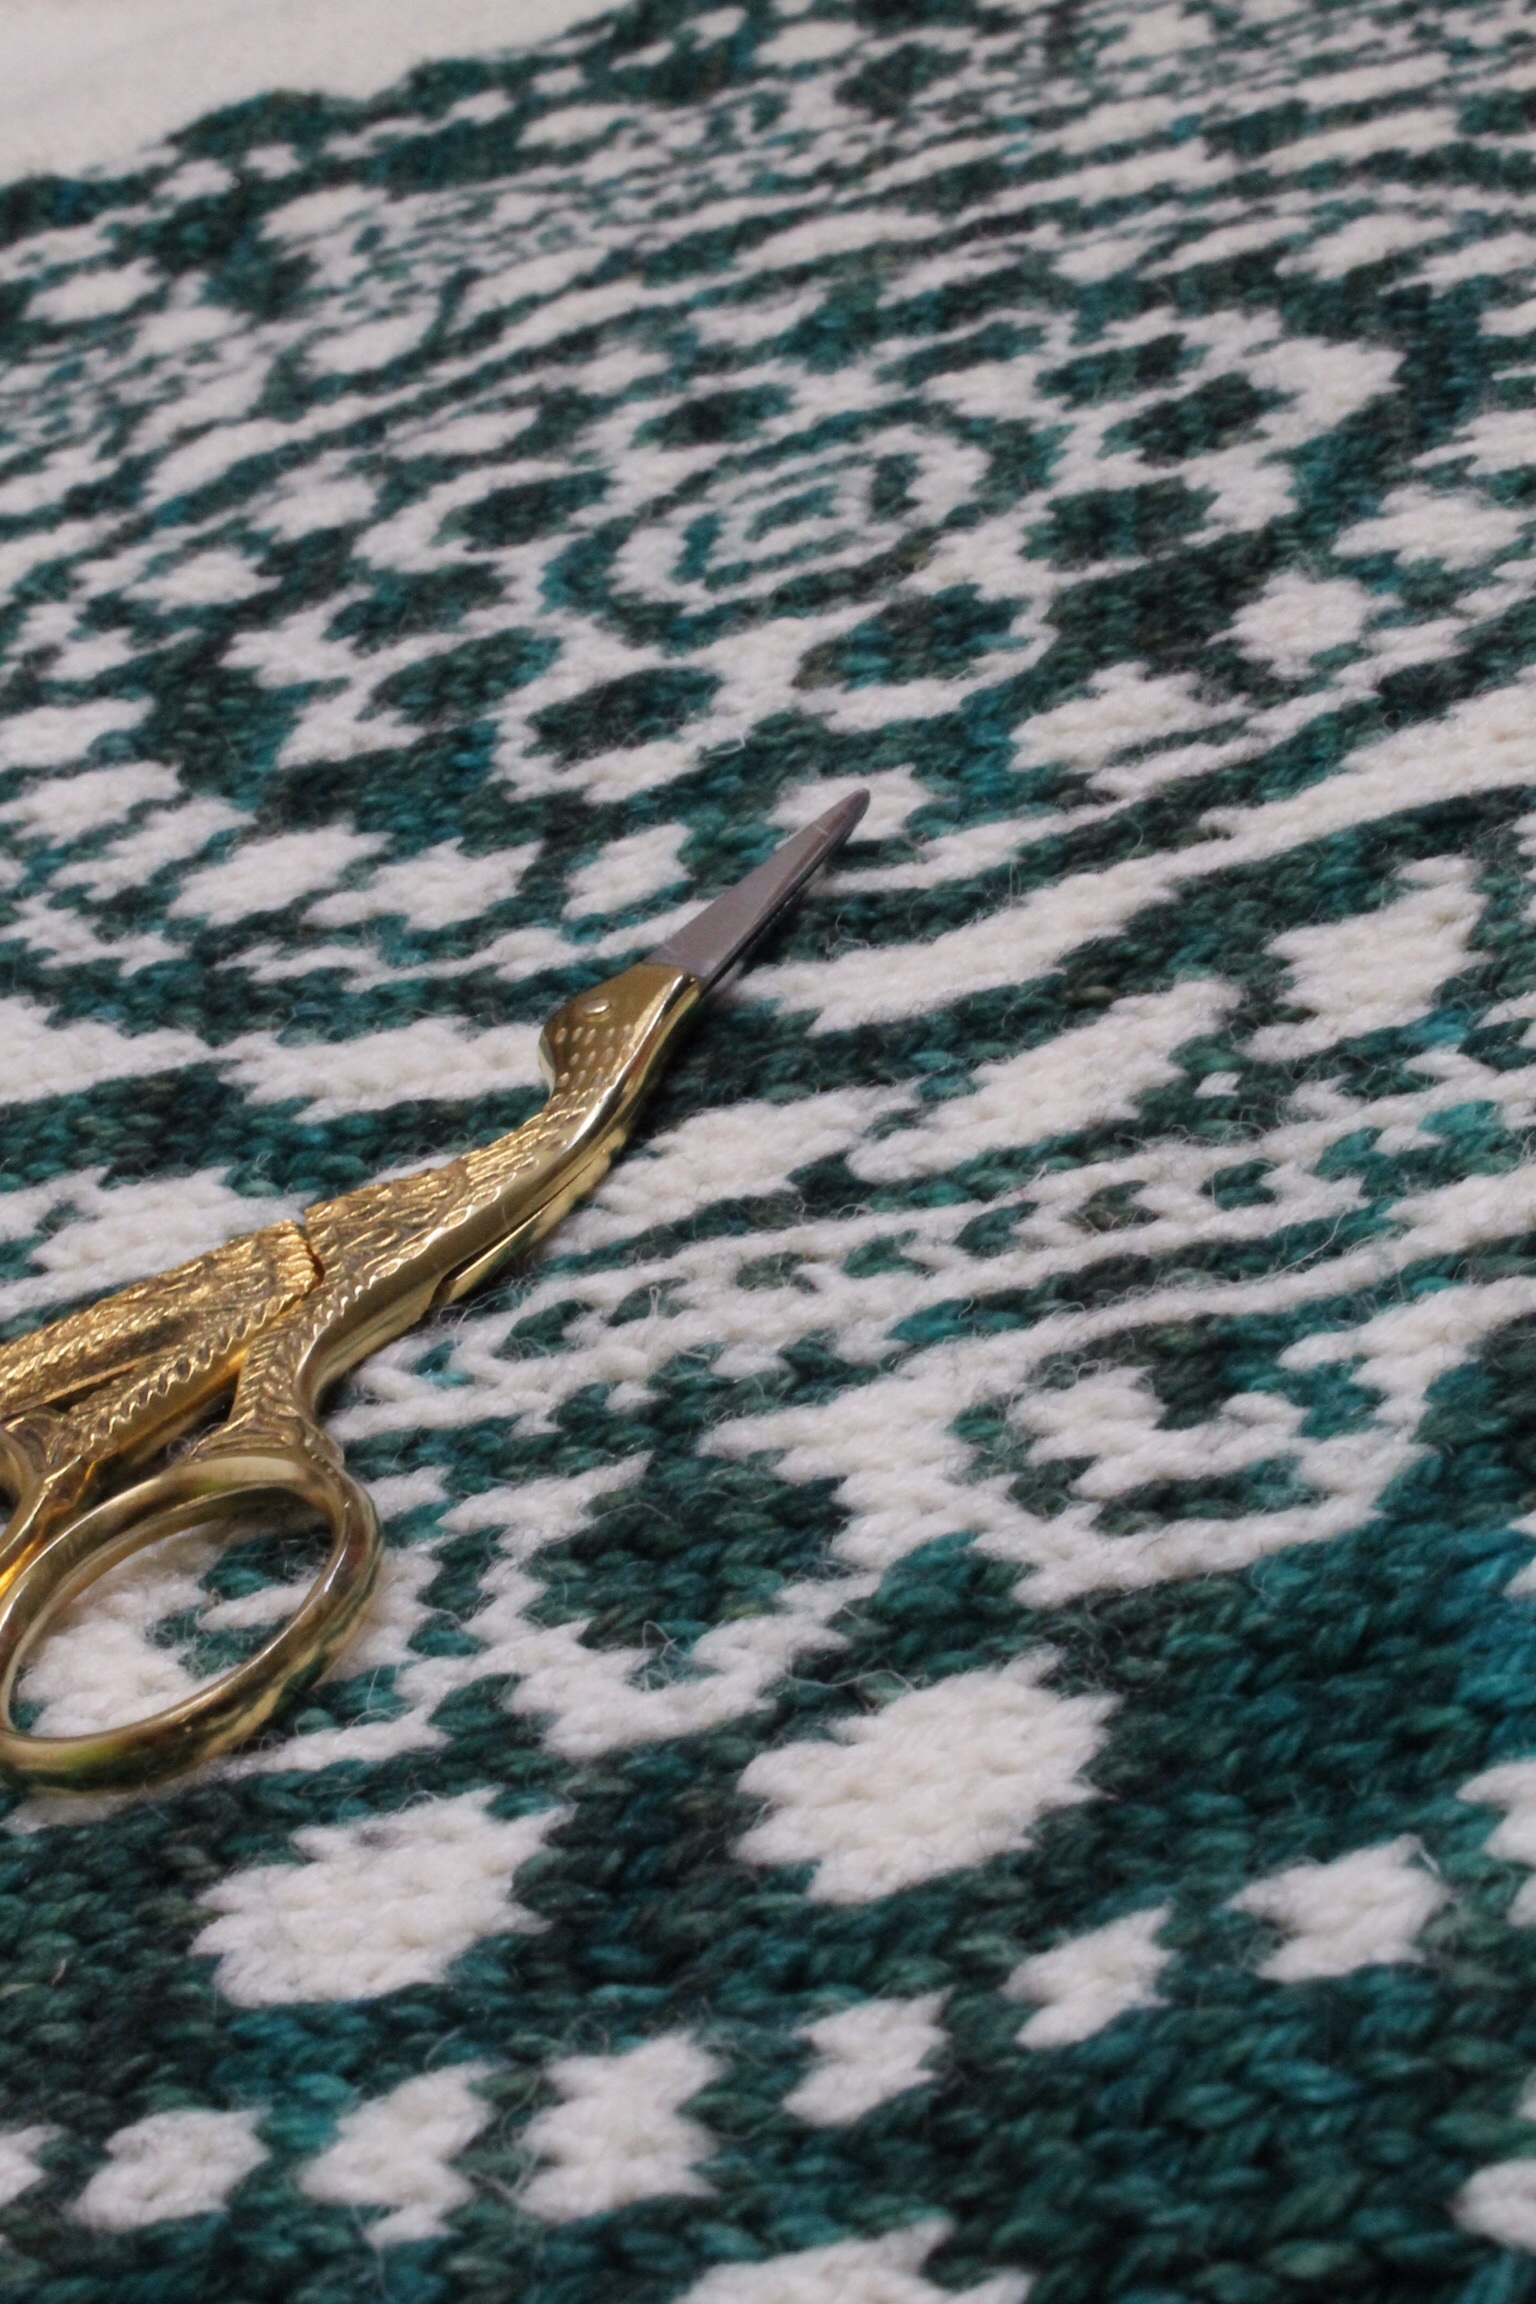
- Cutting! Simply (yes, simply) cut up the centre of the steek. A few words of warning: the first time you do this, you won’t dare take a breath for the entire time you’re cutting, which could prove problematic if you’re steeking something as large as a blanket – do please try not to lose consciousness through hypoxia. You may or may not be well fortified with gin. And when you’ve finished, it will astound you that your knitting doesn’t immediately disintegrate into a pitiful pile of fluff. The second time you steek, you will approach the matter with calm concentration. And by the third time you steek, you’ll hack away distractedly at your stitches whilst yabbering to your best friend about the price of baked beans.
It really is that simple. So here I am, cutting the mandala picture:-
And then the thing can finally lay flat, prior to blocking and then embroidering with gold:-

Naturally, we need a shot with the star of this bloggy show, ie stork scissors, as usual:-
And that, my friends, is all. It’s that simple. 🙂
Thanks for this tutorial. Do you use same yarn that you knit with to sew edges, or you use tread for sewing?
Sometimes I use the same yarn, but you can use anything as long as it’s the same composition as your knitting (ie 100% wool with 100% wool, cotton with cotton, etc). It can often make life easier to use a thinner yarn than the one you knitted with. All the above was written with the assumption that you’ll be washing what you’ve knitted, so will need the yarns to shrink at the same rate, but in the first picture in this post, I just used ordinary cotton sewing thread with woollen yarn, because this is a picture of my knitted blog header and I’m pretty unlikely to wash it. Hope this helps! Thank you for reading. 🙂
Thank you very much!
Thanks for the tutorial and your Mandela is awesome. Can’t wait to see the finished embroidery. – Sharon
Thank you. I always feel I don’t deserve compliments from you, given your talent. Seriously, may I mention you in a blog post soon and post pictures of some of your work, please? I’m just in awe of what you create.
Absolutely beautiful. I think you may be braver than I am;-), but one day, when the quilts are done, I will get there, one deep breath at a time;-)
Your quilting work is stunning. I love your octopus. (But steeking is fun, too.)
Fascinating, Never done this but am tempted to try just to be able to say, “I’ve steeked! Hvae you?”
Do it, do it, do it, do it, do it!
I’m going to ‘sqeeeee’ at you again – that is FABULOUS!! I didn’t realise I was holding my breath just reading the process until I got to the bit where you said ‘…….you won’t dare take a breath ….’ Gasp!! Gulp, gulp!! I don’t think I’d make it through without blacking out a couple of times. But you made it all so clear that should I ever find myself in a position to steek – steek I shall!! Your illustrations are so beautiful – are you sure you are not a secret practitioner of fine art?
My so gorgeous stork scissors are at the ready to spring into cutting action the minute they are needed. I would like to crib one of your photos of them to put into my next blog post – is that permissible?
Awww, thank you, as ever. Yes you may of course use my photos. Now, more importantly, thank you so so so so so much for the parcel that I collected from the post office today! Seriously. I got home from work yesterday to find a missed parcel notice, which weirdly stated that the parcel was ‘flat’. Now, I haven’t ordered anything, so I started hoping so much that this was a parcel of beauty from New Zealand. Dragged the toddler twinnage to our nearby town this morning to collect it and, YES! Thank you, thank you thank you! You know already that I think you’re a wonderful artist, both for your skill in drawing, and for your use of rich colour. But it’s amazing to actually have some of your work sitting in front of me. The large print (Butterflies are flowers…) is especially delightful, and ‘A gardener grows tomorrow’s joys’ is so true but also so gorgeously executed. Thank you!!!!! May I show some of your amazing work in a blog post, please? Obviously I’ll fully credit you. Please? Pretty please?
Oh, and I love the Orlando card too! (But don’t tell Siggy that, or he might be jealous.)
Ha – you make me smile. I’m so happy you are happy! I hoped I’d send something you would like, especially as you were being so recalcitrant about choosing something yourself! I would be most honoured if you showed anything on your blog – show away! 🙂 And we are now fb friends too – happy days!
🙂
Obviously that should’ve been Siddy, not Siggy. I truly have no brain these days. Apologies.
I love your descriptions for how you’ll do your first couple of steeks! Well, I actually love most of the jokes in there, but that bit was particularly amusing! And your mandala is so pretty! Can’t wait to see how you embroider it 🙂
Thank you. I never know whether people would just prefer sensible, serious advice. But I can’t help being flippant.
Wow! Never even heard off this method before, think I would not use gin until I was feeling blazé
Our even blasé
🙂 The gin might help with the feeling blasé, though. But actually it’s not necessary. Steeking is fine. Thank you for your comment.
Your entertaining tutorial takes the “eek” out of “steek” 😀 ❤ <3
Ha ha, thank you! I WISH I’d thought of that line first. And thank you sooo much for Facebooking my post.
Heehee, well you know what they say… gotta share the wit… ’cause you can’t wit ’em all 😉 Your links are fun to share! 🙂 ❤ <3
Steeking is awesome; at least the way you do it is.
Thank you. It’s actually surprisingly easy.
I’m a pupil of yours!!!Great tutorial and have learnt something new and soooooooo useful!Thanks,Phil!!!
You’re always kinder than I deserve, but thank you anyway, m’dear. 🙂
Oh,it’s true,you are a great and very sensible crafter!!!!!I have to learn from you!!!
No, no, no, definitely not. Your work is an amazing, stylish, festival of colour, especially your crochet.
Fabulous. Thanks for the lesson. Have never ventured that far, but now I just might, it does not look like “rocket science” any more. 🙂
It really really isn’t anywhere near rocket science. If I can do it, anyone can.
I am not a yarn artist, though I am in a family of crafty people who do express themselves through yarn art along with other various crafts. And my current fascination with stringing and training my jungle full of gourds might not be all that far from yarn art. But I must say, your writing style is so engaging it is entirely worth reading your posts whether I will ever Steek or not. Thank you very much. Keep ’em coming. 🙂
Thank you for such a generous comment. And I love your stunning photos of the blooms in your garden, so the admiration is mutual.
Thanks for sharing this. I’ve never heard of Steeking. I’m in awe of you steeking your beautiful work. Well done.
Thank you. *whispers*: nothing I’ve made is worthy of any awe. But thank you, anyway.
You are such a brave, brave woman. I screamed when I saw the scissors cutting the knitting in the picture above.
Ha ha, thank you for a comment that made me giggle. 🙂 Steeking was definitely one of those things that used to make me think, “Well obviously, I could never do THAT.” But it’s OK. Honest.
Such a paragon of calmness and self-control! You really do a great job of explaining this in practical terms–if I were a knitter, I’d give it a try! Or maybe I’ll just go take a whack at a sweater I’d like better as a cardigan?
Yes! Do it! At the very least, I’ll pass you the gin if it gets stressful…
Gin? I’ve never had gin. Well, at least not so far today . . . .
Great post! It’s so terrifying making that first cut but kind of liberating haha
Very liberating when you realize that nothing terrible actually happens! Thank you for your comment.
You are slowly luring me back to knitting instead of crochet, especially with your mandala. I love the fact that it is possible to do such crisp colour work designs, and steeking would eliminate those pesky purl rows…. When I find myself regularly poking my yarn with two sticks instead of one it will be ALL YOUR FAULT! 😀
Ha ha, my plan is working! (Evil cackle). You know you want to put down that hook and KNIT………….
Wow, am awe-struck – both by your amazing mandala and your fearless steeking! Love it!
It’s going to be awhile before I dare to try this, but seeing your tutorial starts me on the thinking process.
I promise you, it’s so much easier than it looks. Thank you for your comment. 🙂
I’ll be trying my first ever steek pretty soon as my cardigan is nearly finished. Just need to block it out first! A bit apprehensive but I am hopeful it will turn out alright!
Question, I recently steeled a scarf using rayon yarn. I would like to knit another one in the round and cut it but can I use any yarn or does it have to be rayon?
At a push, you can use almost any yarn, but you’ll need to be VERY careful to sew in every single thread if you’re not using animal-derived natural fibres. Steeking took off in communities practising fairisle knitting, and the pure wool they used was so feltable that they hardly needed to bother sewing their stitches to reinforce them! Anything synthetic (including rayon, which is semi-synthetic despite being cellulose-derived) will take more work to reinforce, but it can be done. Go for it! I’d love to see what you make…
Thank you for the tutorial; I’ve learnt a new word as well as a new technique. I should say, ‘learnt of’ because I am not sure if I’ll ever try it but it’s good to know about its use. Your mention of the nature of different yarns also gave me something to think about. I’ve knitted for decades but still at a beginner’s level. Thanks to blogs like yours and youtube I am picking up new tricks 🙂
And thank you for your comment. Steeking isn’t difficult once you overcome the perfectly natural horror at taking scissors to your knitting! I’ve just been having a look at your lovely blog, especially your thoughts on teaching Chinese calligraphy – something that must surely take enormous time and patience for beginners to begin to master?
Time and patience, yes, as in learning anything new. Thank you for visiting.
Thank you for sharing this information. I made a child’s sweater out of superwash sportweight yarn with a fairisle yoke of sheep. It is my first fairisle project and I am nervous to sew it with a sewing machine steek. Can I use a hand sewn backstitch for superwash yarn?
(Sorry for slow reply: if you’ve seen the latest post you’ll know that it’s been a tricky week.)
First, thank you for your comment. As for using superwash, the proper textbook answer would be that it’s not suitable for steeking because it does not felt. However, the knitting police will probably turn a blind eye if you hand sew it in backstitch as you suggest. Just make sure your stitching is very dense and thorough. And if anyone asks, I didn’t tell you to do that! From your description, it sounds like a rather lovely project. I hope it’s turning out just perfect.
Thank you. No problem. I went ahead and moved on as I had to get the sweater done. I did two rows of backstitch with lace weight yarn and a sharp needle with a row of running stitch in between. I think it is going to be fine. I am also going to cover the inside edges with seam tape ribbon. 🙂 I am sort of hooked on this technique and want to start another Fair Isle sweater for my granddaughter in her next size using fingering yarn.
I agree: it’s going to be fine. Just don’t tell the knitting police. Enjoy your next fair isle sweater. 🙂
You have given me back some of my knitting confidence that I can do this!- thank you for demystifying what I believed was a technique that would take me years to build up the confidence to try!
Oh thank you for such a kind comment! Don’t worry, steeking isn’t that hard really, although you may require wine on the first attempt…
I’m curious if this was the front of a cardigan and you set in a zipper along your cut lines, wouldn’t the stay stitches be seen? How do you actually finish this because it seems like you’d have a lot of fabric in any seam you made. Hope that question makes sense!
Hi Dinah,
I am SO sorry for slow response. And I hope that late is better than never…
Thank you for your comment/question. If you’re going to add a zip, I’d recommend folding the steeked edges under before sewing in the zip. Am I making sense? Happy to chat about this more (and I’ll reply more quickly next time…)
okay so here I am searching for an explanation of how to steek and came across your brilliant tutorial. Yes like others, I nearly blacked out reading it but had a nebuliser handy ! … after taking deep breaths I wanted to say thankyou for that – I will attempt it with confidence and gusto 🙂
Kindest regards – April ( UK )
Yay, very glad to hear that you survived the experience! It really does get easier. Soon you’ll be chopping up your knitting without a care in the world. 🙂
When listing the reasons one might need to steek, here’s another scenario: you’ve knitted an entire hat without having done a gauge swatch and realized half way through that you’ve been wasting time and yarn making it much too large. You skip a whole mess of stitches, only to find that wasn’t enough either. After all this, you know you have to seam your hat, so you find out how to steek! Thank you for your funny and informative blog post!!
Tee hee, I totally feel your pain. I have a jumper (sweater if you’re non-UK) that suffered the same fate. Thank you for your kind words.
Great post! So how many stitches would you recommend? Six?
Hi, and big apologies for being slow to respond – I was a wee bit distracted by Christmas for a few days.
Anyway, your question. Yes, six stitches should be sufficient in most cases, especially if you’re using a fairly rough-textured pure wool. It’s tempting to think that more stitches = more security, but that’s not really the case. As long as you’ve got space to work your reinforcing stitches, you *should* be fine. Enjoy!
I’m eeking about fast approaching my first steeking. Your words calm me somewhat….
Raga jumper in Jamieson’s yarn… is it really, truly possible not to sew if it’s 100% wool… if this is my first time… would you sew – just in case????
I love your human foible approach to this whole thing…
Jac
Hi Jac, and sorry for slow response. I got a tiny bit distracted by Christmas, there!
Wool varies so much in terms of how sleek vs grippy it is. Maybe test out on a little swatch? Or rub two strands together to see how easily they begin to cling to each other. But yes, brave souls in Shetland have been known to steek without stitching. I’ve never tried it, personally!
Good luck, and happy knitting.
I dont suppose you can still get the variegated wool you used in the first photo?
This was a great tutorial! Thank you! I’m working up to knitting a fair isle Cardigan in the round to steek (pattern was written for it to be knit flat, but everyone tells me I’ll be miserable doing it that way). Anyway, I noticed that your mandala has pretty thick white borders around it, did you float the blue across the white when working in the round and then just weave in each row after cutting the steek? Maybe that seems like a dumb question!
I’m not afraid of the steeking. My problem is where to change colors. My directions do it at one side of the steek. It seems to me that if you change colors in the middle of the steek, then you wouldn’t have weave in any ends (big bonus), because you would later cut everything away anyway. Am I missing something?? . I’m working on a cardigan, and am ready to start the color work. Thanks.
Hello, I have exactly the same question as Michaela: where to change colors and what happens with the ends of the yarns; necessary to weave in “away” from the steek or OK to leave “hanging” in the middle of the steek? I am using 100 % Shetland wool.
Thank you for great instructions abt steeking!
Hi Anna-Lena, and sorry about the delay in responding. Good questions. I would change colours at the point at which you’ll cut, because you’ll be using sewing to secure all the ends that are created there. (It’s ok to weave in ends away from the steek if you need to, but it just creates more work!) I hope that this makes sense and is helpful. Best wishes, Phil
Big thank you for explaining it that easy way. Can’t await to knit something colorfull 😀
Can you please tell me the yarn you used to make the twistedyarn.com? I’ve searched for weeks trying to match it but end up frustrated with no wool. You have great taste in the yarns and projects you choose.
Thanks laurelton6
Hi Laurelton, this was so long ago that I had to have a bit of a rummage around to remind myself! It’s made using Katia Azteca in shades 2826 (Red) and 7829 (Natural Brown), but I hacked most of the pink out of the 2826 before I used it! Hope that’s useful. What are you making????????
Phil x
Thanks very much. I’m knitting a vest/poncho. Basically a sweater front and back, A loose neck and buttons on the side.
I just found it and I will be chopping out the pink. I’m glad I’ve just learned how to join wool together leaving no indication that it what been cut. Thanks again. L
I wonder if it’s been too long.
I just steeked a sweater for my daughter. It came out beautifully–and it fits, miracle of miracles–except that there are about 5 loose strands at my steek. I cannot figure out how this happened, since the strands seem not to have been caught by the sewing thread. I discovered them as I sewed on the button band.
In any case, any suggestions for fixing this? I was thinking of glue, but worry about lumpy hard spots. My current plan is to hand sew the strands with backstitch along the line of the main steek stitching.
I made a Fair Isle style sweater and tried steeking for the first time, a fun challenge especially because I adapted a plain sweater pattern and put my own combination of designs in, as well as adding the steeks. However, I crocheted the steeks, and, since I was using acrylic yarn, it did not hold AT ALL. (I was able to save the sweater, though!) I enquired of another knitting site about sewing the steeks before cutting, and was recommened this page. So now I’m going to try another sweater that’s already knitted. I didn’t intend to make it with steeks, but since it’s a variegated yarn (also acrylic, that being what’s available to me), and started on the round, it was easier to add steeks than switch to back-and-forth, and preserved a bit more the pattern with the variegated yarn. I’m hoping for the best using your backstitch method!!
Good luck! Although in theory, you’re not “supposed” to steek with acrylic yarn, if you’re prepared to sew enough tiny little stitches, you should be able to hold most things except cotton. Hope it works…
What project were you working on in the picture of you cutting the steek on the top of this post? Is it a public project that I can work on?
Hi Monika, and thank you for your comment. The piece I’m cutting in the top photo is the banner for this blog, so I’m sorry but there’s no pattern and you’d presumably not want it anyway! Sorry not to be more helpful. Phil x